
Connect Windows 7
These instructions explain how to connect a Windows 7 computer to the eduroam wireless network.
Important: If you have previously used our "easy installer" to configure your system to connect to eduroam, you must remove it and delete your eduroam network profile before continuing.
- Download and run the Windows 7 setup wizard.
You may be prompted to accept a number of changes to your system, it is important to allow all these changes to be made. - As part of the installation, you will be asked for a username and password:
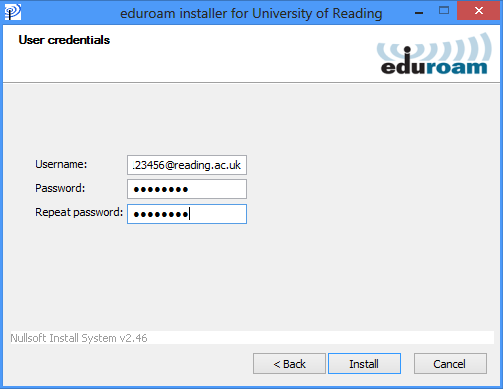
If you are a member of staff, your username is your University username with @reading.ac.uk on the end (e.g. ab123456@reading.ac.uk).
If you are a student, your username is your University username with @student.reading.ac.uk on the end (e.g. ab123456@student.reading.ac.uk).
The password is your University password. - Once installation has completed, choose eduroam from the list of Wi-Fi networks on your computer.
Troubleshooting
If you cannot connect, check that:
- The wireless functionality in your computer is enabled.
- You are at a location with good signal strength.
- If you are a member of staff, you have remembered to add @reading.ac.uk to the end of your username.
- If you are a student, you have remembered to add @student.reading.ac.uk to the end of your username.
- You are typing your University password correctly.
- You have installed all available driver updates for your Wi-Fi adapter and all applicable Windows Updates.
These instructions will only work if you have a University of Reading username - if you are from a different organisation, you will need to refer to your home organisation for the correct instructions.
If you require further assistance, please contact the IT service desk.
Page navigation

QR Code for this page