
Windows XP SP3 Settings
This page explains how to connect a device running Windows XP Service Pack 3 to eduroam. Separate instructions are available for Windows 8 / 8.1 / RT and Windows Vista / 7 systems.
Update the root certificate store
In order to connect in a secure manner, it is necessary to update your system's root certificate store.- Save the Update for Root Certificates [May 2013] (KB931125) to your computer.
- Locate where you saved the updater and double-click on it.
- Accept all prompts using the default values.
Configure Wi-Fi settings
- Right-click on the tray icon for the wireless card and select Open Network Connections. Alternatively, open Control Panel and select Network Connections.
- Locate the icon for the wireless card, right-click on it and select Properties.
- In the window that appears, choose Wireless Networks.
- Tick the box marked Use Windows to configure my wireless network settings.
- Press Add to add a new wireless profile.
- Enter the Network name (SSID) as eduroam, set Network Authentication to WPA2 and Data Encryption to AES.
- Select the Authentication tab.
- Set the EAP type to Protected EAP (PEAP), and uncheck the Authenticate as computer... and Authenticate as guest... boxes.
- Press Properties.
- In the Protected EAP Properties window, select Validate Server Certificate, tick Connect to these servers, enter radius.auth.reading.ac.uk in the box, then choose AddTrust External Root CA as the trusted certificate.
- Under Select Authentication Method, choose Secured Password (EAP-MSCHAP v2). Ensure that the Enable Fast Reconnect box is checked and the remaining two boxes remain unticked.
- Choose Configure (next to Select Authentication Method), and untick the box labelled Automatically use my Windows logon name and password (and domain if any).
- Click OK four times.
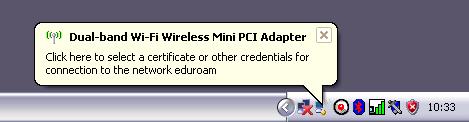
- After a short delay, a balloon notification will appear, asking that you Click here to select a certificate or other credentials for connection t the network eduroam. Click on the notification.
- If you are a member of staff, in the window that appears, enter your University username followed by @reading.ac.uk (e.g. ab123456@reading.ac.uk), and your University password. Leave the logon domain box empty.
- If you are a student, in the window that appears, enter your University username followed by @student.reading.ac.uk (e.g. ab123456@student.reading.ac.uk), and your University password. Leave the logon domain box empty.
- Your system should now connect to eduroam.
Your system should remember your credentials and automatically connect to eduroam wherever it is available; however you may be prompted to re-enter them if you change your password or if the authentication servers are unavailable.
Troubleshooting
If you cannot connect, check that:
- You are at a location with good signal strength.
- If you are a member of staff, you have remembered to add @reading.ac.uk to the end of your username.
- If you are a student, you have remembered to add @student.reading.ac.uk to the end of your username.
- You are typing your University password correctly.
These settings will only work if you have a University of Reading username - if you are from a different organisation, you will need to refer to your home organisation for the correct instructions.
If you require further assistance, please contact the IT service desk.